Explore A Step By Step Guide on Digital Printer Printing Process
2026-06-03 06:45:23

Are you tired of dealing with complex, expensive printing processes and long turnaround times? If yes, don’t worry, because digital printing serves as a one-stop solution. With streamlined processes, digital printers ensure improved quality, faster turnaround times, and reduced costs.
So next time you want hassle-free, cost-effective, and faster printing results, confidently choose digital printing. If you want to know how it works, explore a step-by-step guide on the digital printer printing process here:
An Overview of the Digital Printing Process
Digital printing is a method of transferring a digital image directly onto a variety of media such as paper, fabric, plastic, etc. It uses professional-grade inkjet or laser printers instead of physical printing plates.
This process enables fast, on-demand, and customisable production, making it ideal for small-run and high-quality printing. Unlike offset printing, digital printing doesn’t need physical plates to transfer an image, which eventually reduces setup time and cost. Have a look at the key aspects of digital printing here:
A Step By Step Guide on Digital Printer Printing Process
Since you have developed a basic understanding of digital printing, let’s begin exploring how to print your materials using the digital printing process:
Step 1: Create Design and Artwork
You can begin the digital printing process by creating a design with the help of graphic design software (e.g., Adobe Illustrator, Photoshop). It is important to ensure you design artwork at a high resolution, typically 300 DPI (dots per inch) or higher, to avoid pixelation.
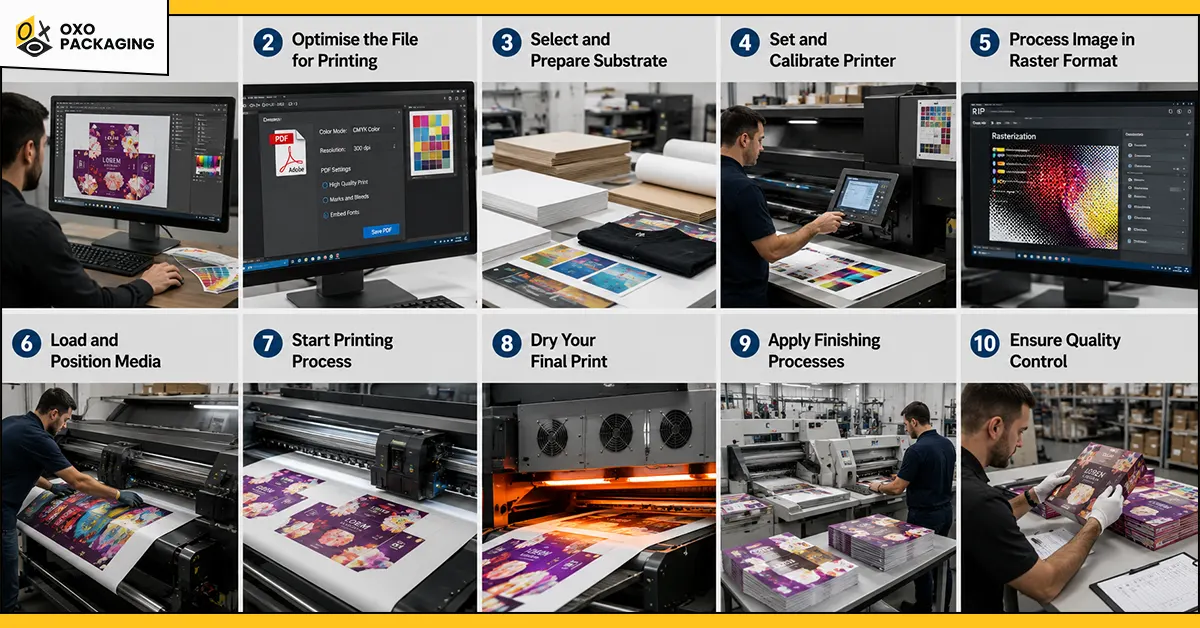
Step 2: Optimise the File for Printing
After creating the design, finalise your digital file. Then, convert it into a compatible format, most commonly a high-resolution PDF. During this stage, you can convert colours to CMYK (Cyan, Magenta, Yellow, Key/Black) colour mode to ensure accurate, professional colour reproduction on press.
Step 3: Select and Prepare Substrate
For certain materials, especially fabrics in direct-to-garment (DTG) printing, a pre-treatment solution is applied to ensure the ink adheres properly and colours appear vibrant. The material is then dried, creating a smooth, flat surface.
Step 4: Set and Calibrate Printer
Before printing, the printer software checks the file and adjusts colour profiles to match the printer's capabilities. Proper calibration ensures the colours printed on the material accurately match the design on the screen.
Step 5: Process Image in Raster Format
Then, load the file into the printer, and the RIP (Raster Image Processing) software converts the digital design into a series of tiny dots that the printer can understand. You can also select the appropriate pallet, paper type, and settings (such as single or double-sided printing).
Step 6: Load and Position Media
The print substrate (paper, banner, or garment) is loaded onto the printer and positioned perfectly flat on the bed or feed tray. Ensuring the material is flat and free of wrinkles is essential to prevent distortion during printing.
Step 7: Start Printing Process
The digital printer begins the printing where you move print heads back and forth to spray ink (inkjet) or apply toner (laser) directly onto the material. The printer reproduces the image pixel by pixel.
Step 8: Dry Your Final Print
For inkjet and solvent printing, the material is passed through a heating unit to dry the ink or bake it onto the item. This step is significant for ensuring the longevity and durability of your print.
Step 9: Apply Finishing Processes
In this post-printing stage, the materials often undergo finishing, where you cut your final printed product to the final size. This is because digital prints often come in large sheets that must be cut down to their final, precise size. This stage also involves applying a protective coating and folding or binding into booklets.
Step 10: Ensure Quality Control
The final products are inspected for accuracy, colour consistency, and defects. A digital or physical sample is sent to the client to verify colour and layout before production begins. Once cleared, the materials are packaged for delivery or pickup. You can label these packages with shipping information for delivery.
Choosing the Right Digital Printing Supplier
As you have explored a step-by-step guide on the digital printer printing process, you are good to go for this on your own. But if you want to outsource this challenging process, ensure you make the right choice.
For example, OXO Packaging is a reliable supplier that uses modern, high-quality digital equipment that produces sharp images and accurate colours. They maintain your brand integrity, ensuring product quality, managing costs, and meeting tight deadlines for your digital prints.
Digital printing is a direct-to-substrate process that transfers digital files (PDFs, images) onto materials like paper, fabric, or plastic without using physical printing plates.
Digital printing on fabric is a modern, inkjet-based process that applies digital designs directly onto textiles, acting like a high-resolution paper printer for fabrics.
4-colour process (offset) printing uses plates to apply wet ink (Cyan, Magenta, Yellow, Black) for high-volume, cost-effective, and consistent prints.
Reactive digital printing is an advanced, multi-step textile process where reactive dye inks are jetted directly onto fabrics and, through heating, form a covalent chemical bond with the fibre molecules.